
Users may record their activities in novel and entertaining ways using action cameras. Choosing where and how to place your camera is half of the pleasure. Knowing how to pick and use an action camera body mount is key to that. Do you wish to immerse your audience in a first-person POV?
Perhaps a lower viewing angle would be preferable. The action is best framed from handlebars or a vehicle’s bonnet. We’ve compiled a list of 10 excellent action cam mounts to offer you some ideas on how to capture your next experience.
1. Head And Helmet Mounts
Head and helmet attachments let you capture video from close to your line of sight, which is ideal for shooting first-person POV footage. Shoot immersive video with a head or helmet attachment for non-impact events like skiing, rafting, or hiking.
Depending on the quality of your action camera body mount, you may want to consider something more solid for activities where you’re getting jostled about a lot.
2. Clip Mount For Action Camera
Finding an appropriate mounting position for the activity you are performing could be challenging at times. It is where the clip mount excels since it can attach itself to any surface, such as clothes, backpacks, or other carryable goods, utilizing its high-tension jaws.
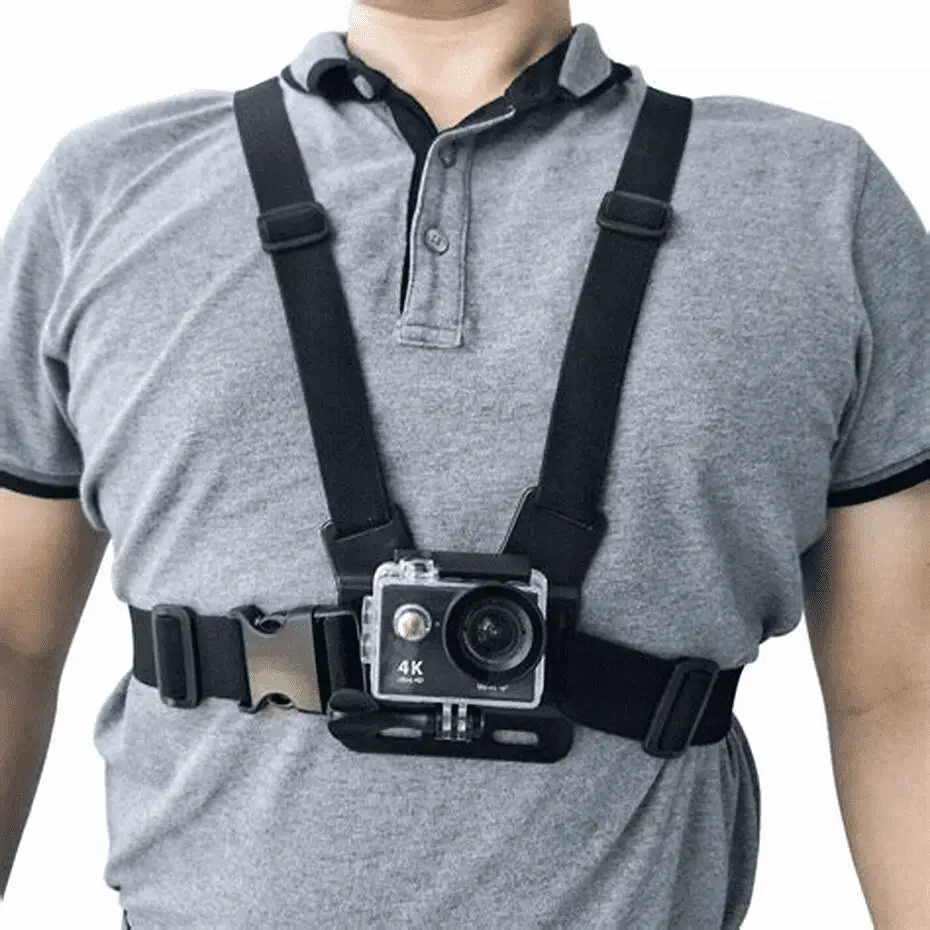
3. Chest Mount
Chest mounts are ideal for tasks that need you to be at a lower angle than your eye-line. Depending on the camera and activity, they may also give a more steady shooting option.
However, if you do a lot of jogging, be careful of utilizing a chest mount since you may wind up with many videos framed by your arms moving up and down.
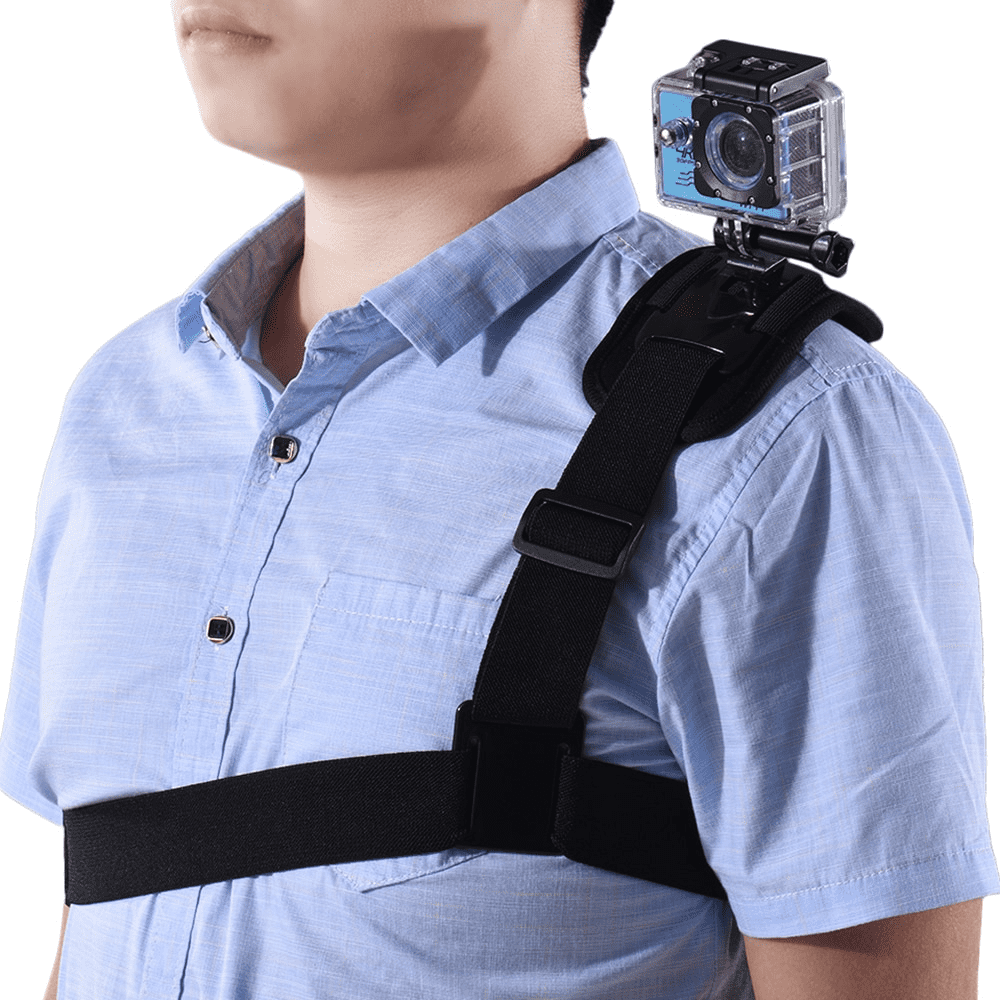
4. Shoulder Mount
The camera on your shoulder will provide a greater viewing angle than the camera on your chest. This mount, however, cannot be used for any outdoor activity. The camera may damage or the film won’t be as good if you’re going up, therefore it’s preferable to choose an alternative spot.
Some shoulder mounts are worn over your chest to help support the action camera body mount on your shoulder. A shoulder mount is often water-resistant, has highly solid joints to hold your camera firmly in place, and has a 360° rotating angle so that the camera may rotate.
5. Finger Grip For Action Camera
A finger grip is a helpful method to control your camera while you’re doing anything else. It allows you to hold the camera at any angle without fear of it falling out. With a single touch of the button, you may also snap images and movies.
This approach may provide some unique pictures since the viewing angles can be altered in whatever manner you like. In the vertical dimensions, you can normally attain an angle of approximately 120°.
When properly oriented, you may create a wholly unique point of view that will make your pictures stand out from the crowd. However, since you would lose one hand during shooting, this is not suitable for many forms of activities.
6. Wrist Mount
One of the best features of wrist mounts is the amount of control you have over your action camera body mount.
While shoulder, chest, and head mounts are helpful for many applications, they do not provide the same level of flexibility as a wrist mount. You can modify the camera’s angle, focus, and point of view without removing it from your wrist.
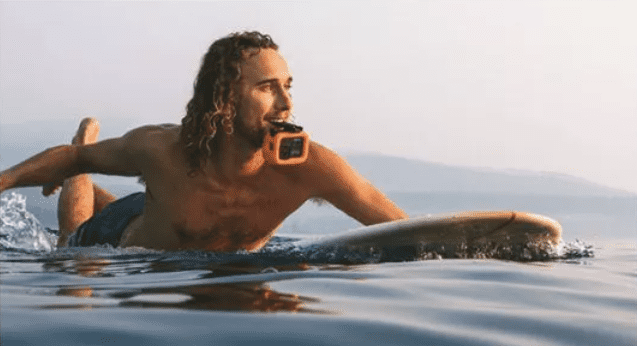
7. Bite Mount
It is the only section of the list dedicated to particularly specialized hobbies, such as surfing. In part, this is since you’ll need both hands to complete the motion, and the angle of view from around your lips gives the entire image a very action-like sensation.
You insert your camera into the attachment, and there’s an area where you bite down to hold the device in place. It’s ideal for shooting some incredible films. However, this is only utilized on rare occasions since continuing to bite down on anything throughout your activities might create jaw pain.
If you don’t bite down hard enough, your mount may wash away as well. It is why some gadgets include a “floaty,” which is a device that keeps your camera flying and visible. To be protected, it’s a good idea to acquire this item as well so you don’t lose your precious camera.
8. Backpack Mount
Technically, this isn’t a body mount – but it’s near enough that you should consider it as a possibility. Mounting your action camera to your backpack is practical since you don’t have to add additional straps to your body, which might be unpleasant.
Depending on where you attach the harness to your body, you may see it from the viewpoint of either a shoulder or chest mount.
Also, by connecting it to the backpack rather than the straps, you may capture what’s behind you – or, for example, capture a third-person view if you’re climbing with a companion.
9. A Mask Mount
Finding a body mount to take your action camera underwater isn’t always straightforward, especially when you’re already wearing special suits and carrying oxygen tanks on your back. As a result, a mask mount is best for taking your action camera along with you on your diving or fishing activities.
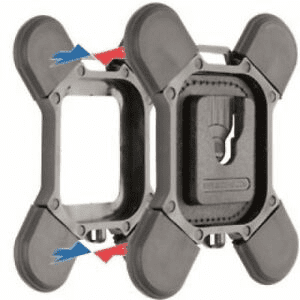
10. Magnetic Mount
It is one of the most adaptable action camera body mounts on the market. It is made up of two magnetic components that enable you to attach your action camera body mount to your clothing, baseball cap, gear bag, and so on.
You may quickly modify the angle of view of your picture this way. A magnetic action camera body mount, sometimes known as a snap attachment, is lightweight and easy to wear when riding, skiing, bicycling, or climbing.
SNAP Mount is an incredible brand, but there are others on the market as well; make sure it is lightweight and the magnets are strong enough to hold your action camerabody mount.
Choosing The Right Body Mount For The Action Camera
When picking a new mount for your dog, keep in mind the following:
- It should be simple to modify, therefore avoiding ties and knots.
- It must be able to be washed and dried.
- Select a mount that is appropriate for your body type and will keep you comfortable when playing or jogging throughout shooting hours.
Tips On Taking The Best Video
As much as we love our action camera body mount, we don’t want wobbly or unwatchable footage. To overcome this, here are some helpful hints for utilizing your action camera:
- Invest in a mount. It will help to balance the camera.
- Look for a unique outlook. Don’t settle for a headshot. Strap your mount on your front, roll bar, or anyplace else you can think of to get a different view.
- There is no camera mounted on the helmet’s peak. As a result, the footage is unsteady. Instead, use a chin strap.
- Use filters, such as a red filter for underwater photography. It will aid in the removal of the blue-green color cast underwater. In bright light, use neutral density filters. Experiment.
- Experiment with time-lapse photography. There should be a time-lapse function on your action camera. It may provide fascinating images for a video.
- Make a plan. Consider your film’s appearance and behavior days in advance.
Conclusion:
Choosing the best action camera body mount may be almost as tough as selecting a camera! You’ll need to think about the type of event or events you want to shoot, the angle of view you want, your body type, and, of course, if it’s suitable with your camera.
Fortunately, body mounts are rather inexpensive in most circumstances, so you can purchase one for each necessity.
However, if you are on a limited budget, we advise purchasing simply one more adaptable and high-quality item rather than many low-cost items.